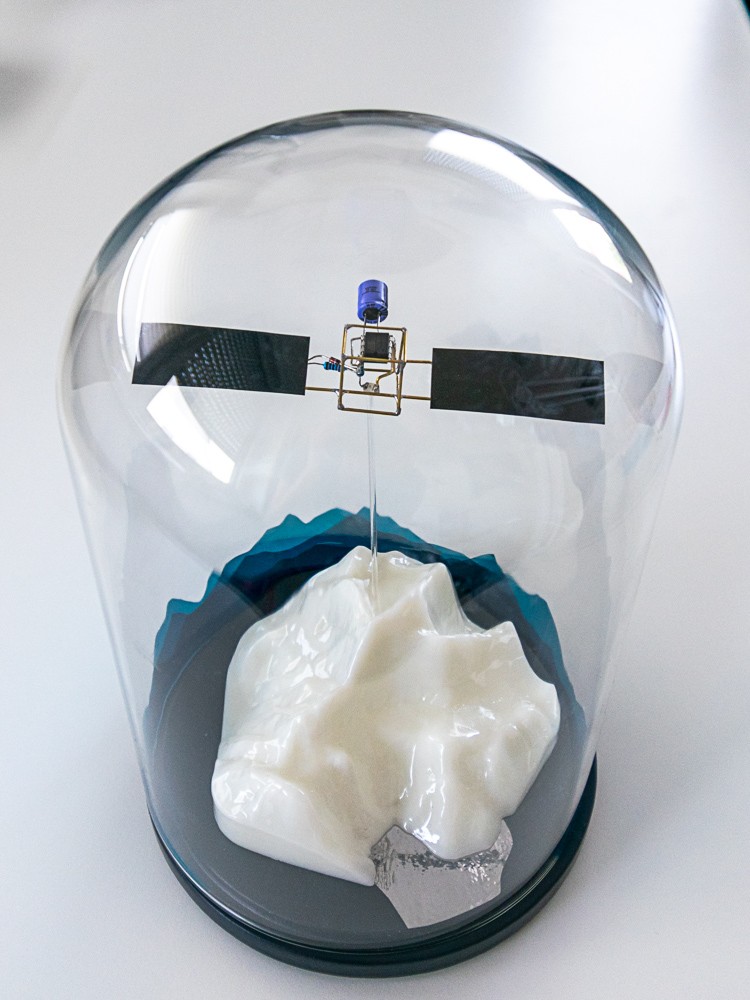
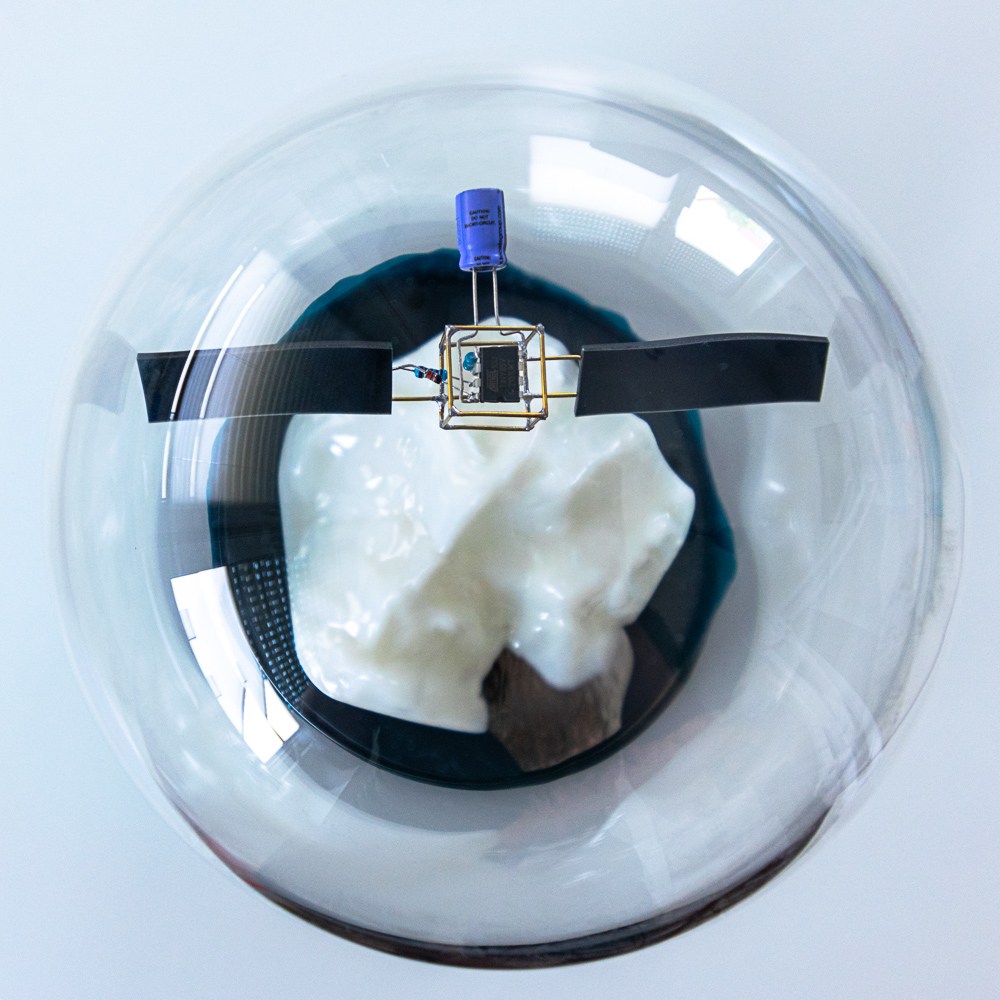
A couple of months ago I found this tiny cube satellite build on the internet and was intrigued. So I started to source materials to build my own.
The only thing I wanted to do differently was to add a mountain base to it. I found a open source model of Monte Civetta and sliced it to fit my base.
Sadly I don’t have the source anymore. I remember it was quiet tricky to find. And the model was huge meaning that I had to reduce the mesh significantly before I even could start to modify it.
My printer required 9h to print the hollow(!) mountain in ABS after which I vapor smoothed it to get a really nice finish.
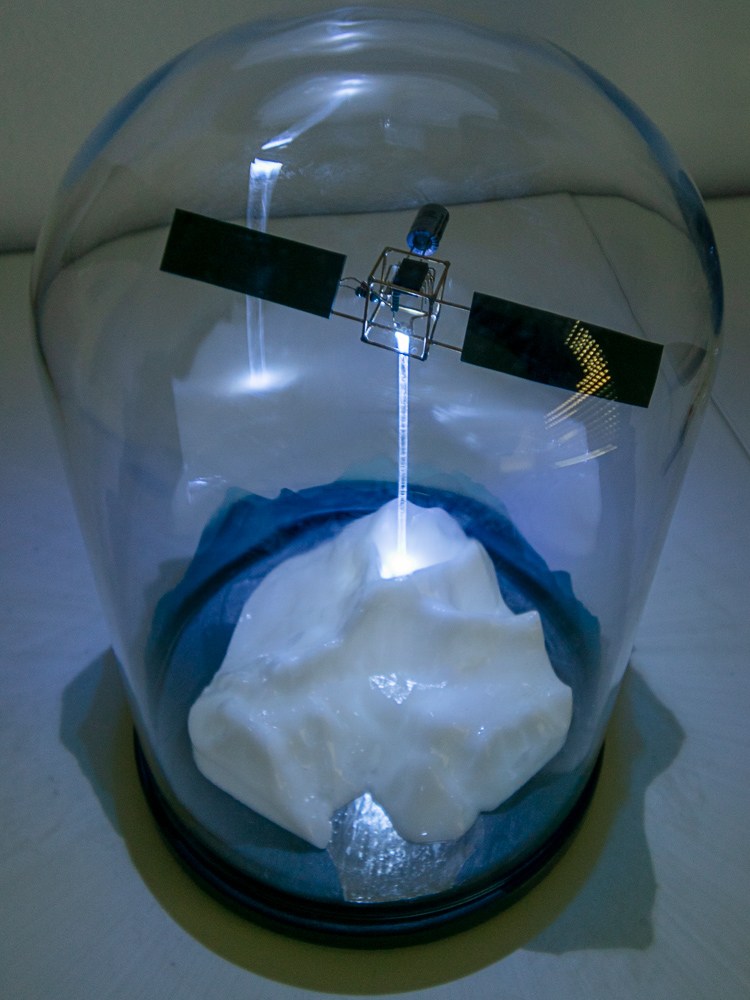
I bought a glass dome with a white wooden base and used some hard wax oil to make the base grey. The part of the base that will be covered by the mountain I plated with some aluminium foil to increase the reflection of the surface. The goal was to illuminate the mountain by the satellite once in a while.
Electronics and source code
I spent most time developing the code for the ATtiny85. The final breadboard design is in the picture below. The real breadboard looked way messier since I also attached my ISP and serial reader to it.
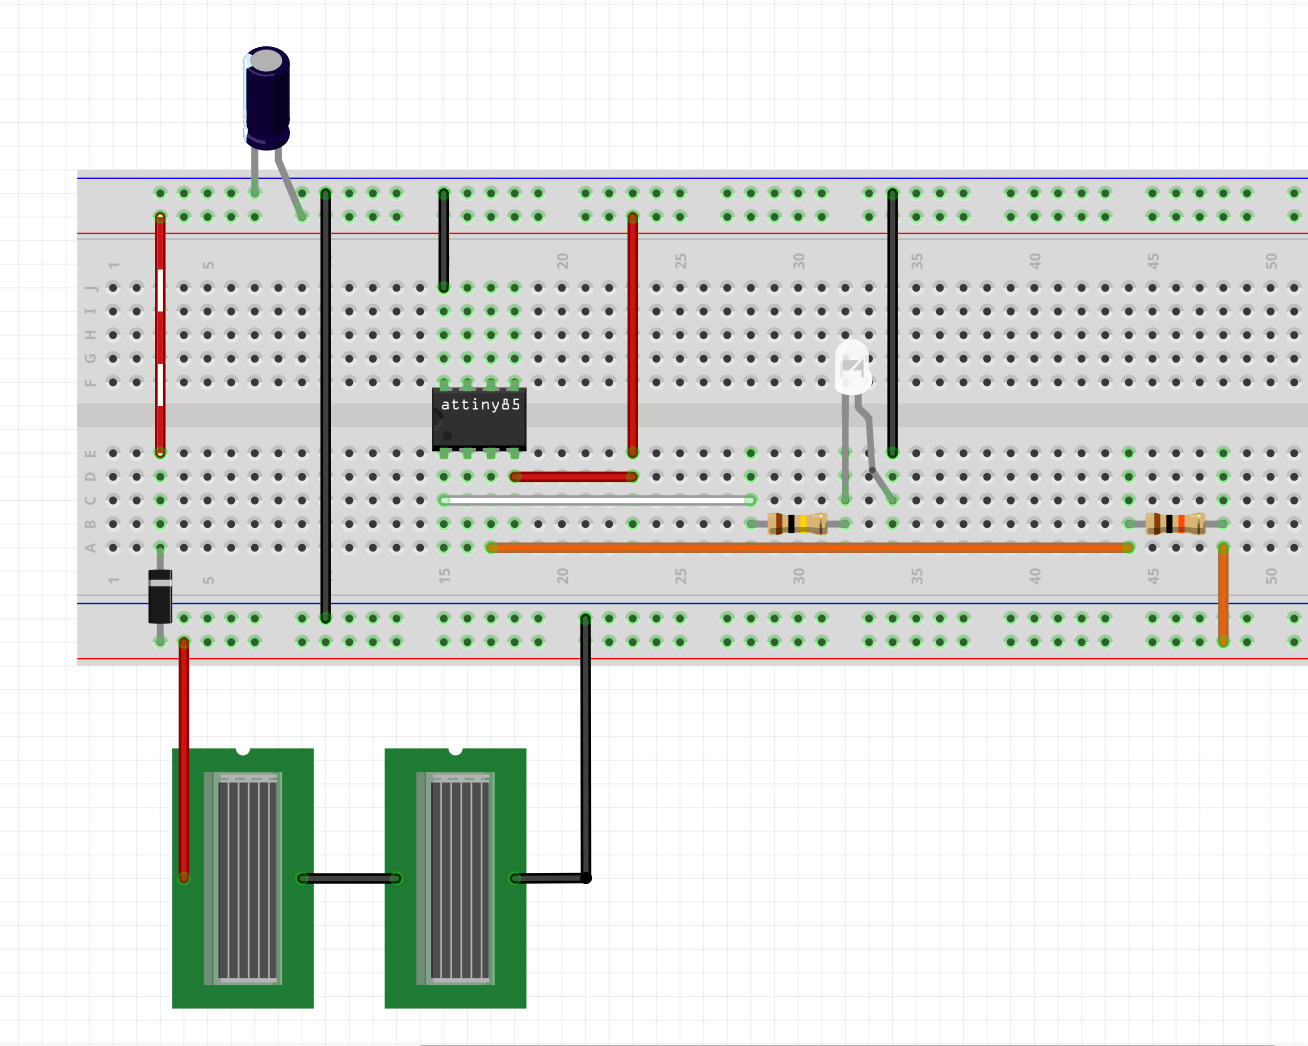
The bottom plus line of the breadboard is connected by a Schottky diode with the plus line on the top.
I flashed my Attiny85 with a clock speed of 1 MHz. I also experimented with lower clock speeds but ended up soft bricking one of my ATtiny85.
My next project will be to rescue the bricked ATtiny85 microcontroller by resetting the fuses. Below 1 MHz seams interesting but I think it will be too messy since the sleep does not work correctly anymore and you have to implement your won sleep. That also means that the code for the LED duration needs to be modified.
That said I am quite pleased with the 1 MHz clock speed since the microcontroller seams to always have enough battery left to light up. The code I ended up using on my ATtiny85 is hosted as a Gist on GitHub called CubeSat.ino. Feel free to comment on the code. I am by no means an expert in Arduino - I usually work with .NET.
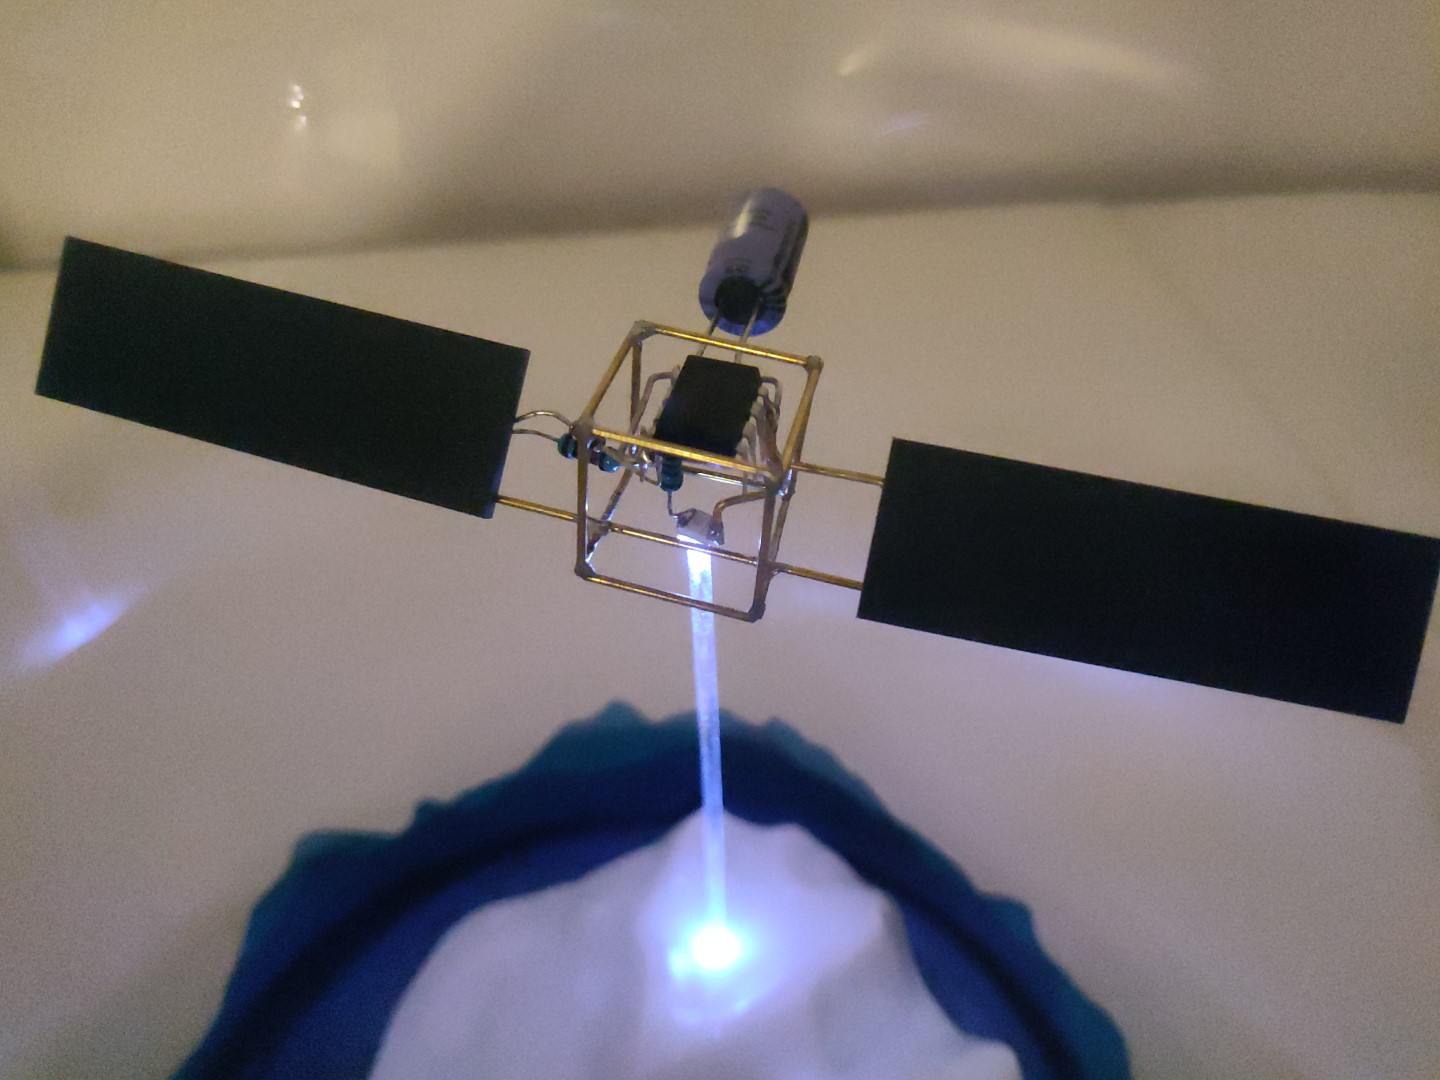
The microcontroller uses the solar cells voltage to detect if it is day or night time. If it is night, it will run the glow effect once every ~10 minutes as long as the total voltage of the system does not go below a threshold that would prevent the LED from light up.
The glow effect can be seen in the following video. Please keep in mind that it had to be dark in order to trigger the effect. That means the video is a little bit noisy.
Soldering
I am usually not bad with soldering and know how to get a good joint. But the scale on the cube sat is tiny and I haven’t found any good clamp system that was not fiddley.
Most parts are floating in midair when you solder them or, in case of the cube, require you to solder 3 parts at once in a perfect angle.
My cube has a diameter of 15 mm and I use .8 mm round brass rods. I started by bending most of the edges of the cube out of one rod but I did not like the curved edges. That’s why I had to solder 3 legs at a time.
Long story short for a perfectionist the soldering part is a nightmare. And I am reluctant to post close-ups. If anyone has a good setup to solder a perfect cube - I’m looking at you Mohit Bhoite - then by all means enlighten me!
Bill of Materials (BOM)
Make sure you buy the ATtiny85 10PU version. Only that one can operate on very low voltage (starting at 1.8 Volt).
Electronics
- SM141K04LV-ND MONOCRYST SOLAR CELL 123MW 2.76V
- 2085-TPLC-3R8/10MR8X14-ND 10F 3.8V T/H
- ATTINY85V-10PU
- SMD LED DIODES 3528 1210 WHITE
- 1N4148 DO-35 IN4148 AXIAL LEAD SWITCHING SIGNAL DIODE
- 100KΩ AND 10KΩ RESISTOR
- .8 MM ROUND BRASS RODS
Base
- 2MM ACRYLIC ROD
- ONE WAY MIRROR WINDOW PRIVACY FILM BLUE
- GLASS DOME WITH WODDEN BASE 20CM
- LIGNOCOLOR HARD WAX OIL ANTHRACITE GREY
Pictures