As I’m leaving my current hosting provider, my WordPress backup needs to run on Azure. In this blog post I’d like to explain a few different ways to archive this. There are three possibilities I have encountered so far. Let’s start with the simplest.
The simplest way to get WordPress up and running on Azure
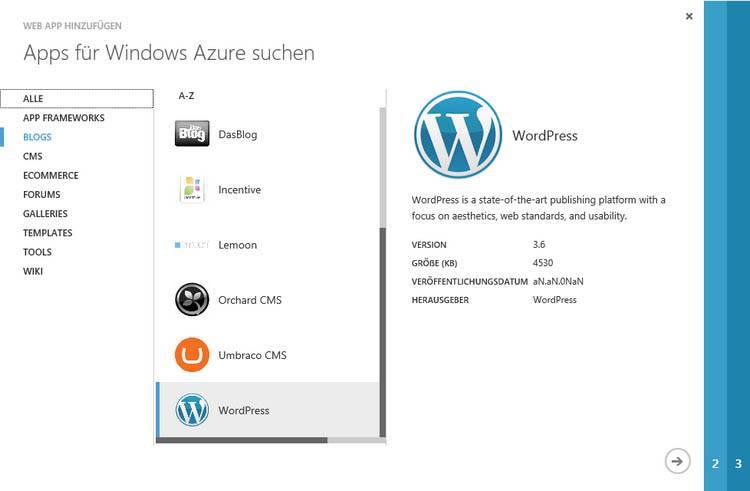
For the first migration of you WordPress blog to Azure you only need an Azure account. Create a new Website by choosing “Website from catalog” and select WordPress from the blog section. You need to enter a domain name for your blog and accept a third party service to host your MySQL database. Thereafter your blog will be created .
By browsing to your recently created domain you’ve be prompted to setup an admin account for your blog. Next you create a backup of your old WordPress blog. Therefore you select the export option in the tools menu of your admin panel. As a result you’ll get a WordPress eXtended Rss file (WXR). This file you have to import into your new blog on Azure. The import function is located in the same menu like the export function – maybe you will be asked to install a plugin supporting the import. Now, your blog on Azure contains all your posts and the migration is finished.
Running WordPress on Azure with a Microsoft SQL database
For using this method you need to know how to work with a FTP client. To start with, we create a new Azure website and upload the downloaded and extracted WordPress files into the wwwroot location of the website.
As an alternative, you can use the website we have just created and remove the database by unlinking it from the website. This can be done by browsing to the settings of you website, in the sub-menu “Linked Ressources”.
Thereafter you have to download the WordPress DB Abstraction plugin. Extract it and copy it to the ./wp-content/mu-plugins/wp-db-abstraction/ folder on your website. Also you have to extract the db.php file from this plugin and copy it into the ./wp-content/ folder. Finally, you need to remove the web.config file in your WordPress root directory – this file will be auto generated by the plugin.
Now let’s get a new MS SQL database by browsing to the website settings and creating a new linked SQL database resource. Than you have to navigate to the following location of your WordPress domain with your browser:
./wp-content/mu-plugins/wp-db-abstraction/setup-config.php
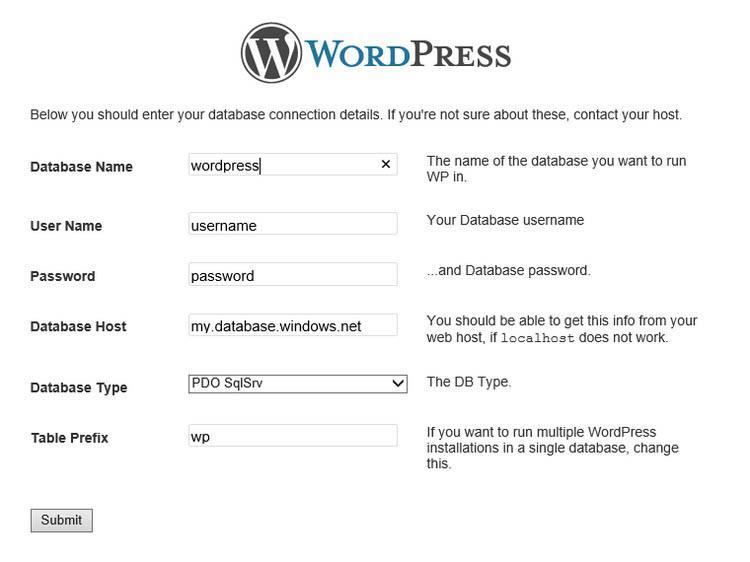
After having browsed to domain above, you’ll get a screen asking you for your database credentials. Insert your database without the port and choose PDO SqlSrv as database type. The rest is self-explaining. Afterwards your database connection is set and you can create a new admin account. To import you current WordPress data you need to follow the steps having been described above (simple solution).
The third way. Cloning you MySQL database to MS SQL
This alternative should be used by those who know what they do. To start with, setup you Azure WordPress blog having been described above – with one exception: instead of creating a new admin user and using the import function of WordPress you need to clone the existing MySQL database to the new MS SQL database.
In order to fulfill this task you need the Microsoft SQL Server Migration Assistant. When you have downloaded and installed it you need to create a new project and select the migration to Azure option. Before filling out the connection settings to Azure you have to go to the Azure dashboard and add the current IP to the acceptance list of the database server. Afterwards you can setup the connections.
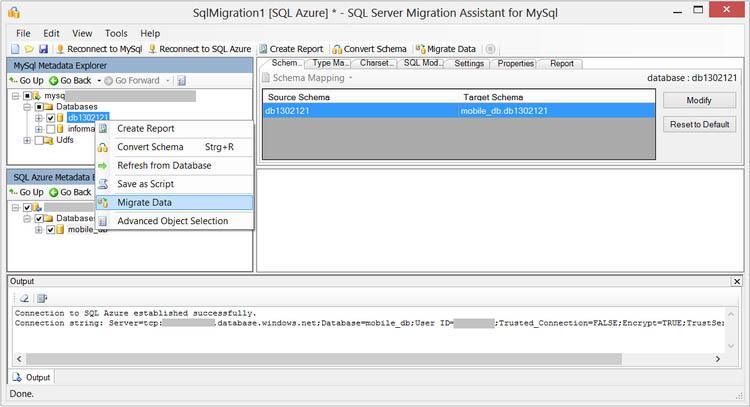
Having established both connections you can go to the MySQL database which should be cloned and select “Convert Schema” from the context menu. This will locally(!) convert the existing schema to the MS SQL database. Check the result. If it was successful, select the Azure database and choose “Synchronize Database” from the context menu. This will process the local changes to the database.
Than you choose “Migrate Data” from the MySQL database and synchronize the Azure database again. That’s it. If everything is all right you have an exact clone of you MySQL data in your Azure database, now. Check it by browsing to you Azure hosted WordPress blog.