In this tutorial I explain how you configure WireGuard on your devices to access remote networks.
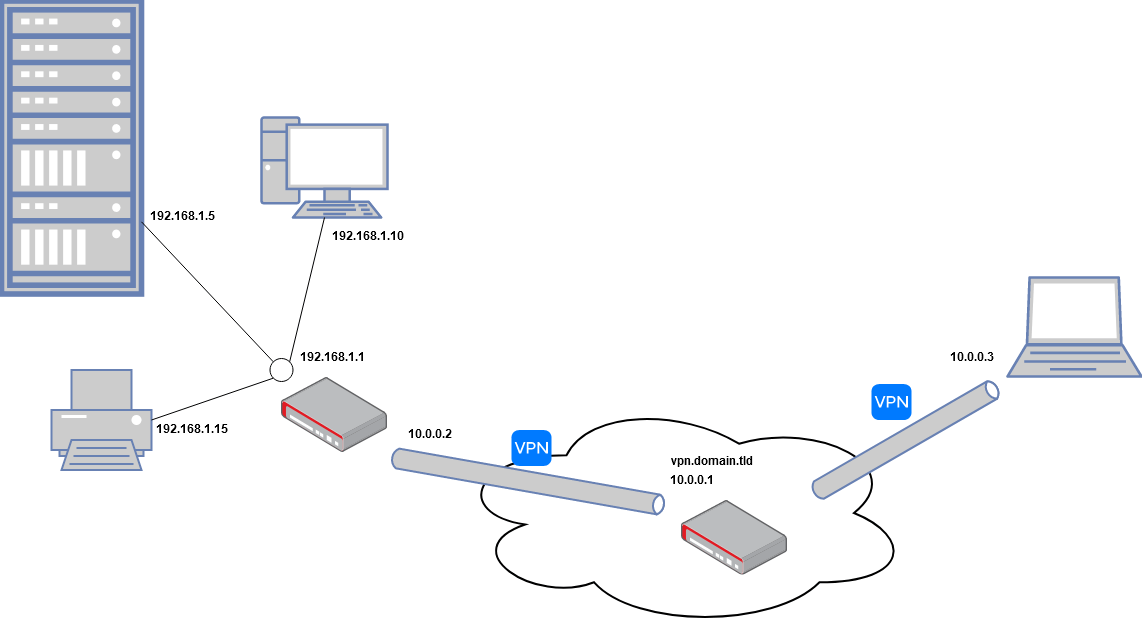
The network layout
We will have one office location with its own local network 192.168.1.0/24. And our VPN network will have the IP range 10.0.0.0/24. Our network layout will have one central VPN server in the cloud that can be reached by the domain: vpn.domain.tld. The goal of this tutorial is to make the office network accessible to other clients that are connected to the central VPN server.
Installation
Before we start with the configuration, we need to install WireGuard on all devices. The best way is to follow the official WireGuard installation instructions.
Setup
Next, we create private and public keys for each WireGuard installation.
- Change the directory to the WireGuard folder
- Prevent credential leaks in race conditions
- Generate key pair
$ cd /etc/wireguard/
$ umask 077
$ wg genkey | tee privatekey | wg pubkey > publickey
If you like to add a mobile device to your VPN network you should create an additional key pair on one of the devices.
$ wg genkey | tee mobile-client-privatekey | wg pubkey > mobile-client-publickey
I will show you later how you can transfer the configuration to your mobile once it is complete.
Configuration
Before we start, we need to enable IP forwarding on the servers. Edit /etc/sysctl.conf on the VPN server and office server and uncomment these lines:
$ sudo nano /etc/sysctl.conf


# Uncomment the next line to enable packet forwarding for IPv4
net.ipv4.ip_forward=1

# Uncomment the next line to enable packet forwarding for IPv6
#  Enabling this option disables Stateless Address Autoconfiguration
#  based on Router Advertisements for this host
net.ipv6.conf.all.forwarding=1


$ sudo sysctl -p /etc/sysctl.conf
Now we can start with the configuration of WireGuard:
- Switch to the WireGuard folder
- Create a new configuration file
- Display the private and public key in the console. (You will need them in the next step.)
$ cd /etc/wireguard/
$ touch wg0.conf
$ cat privatekey publickey
YHJ[....................................]AS=
/SD[....................................]HK=
VPN server configuration
For the VPN server we need to configure two things. First we need to configure the interface. The interface defines the LAN IP address of the server and it’s private key as a minimum. You can also set the port the server should listen for incoming requests. If you do not set the port it will be chosen randomly.
[Interface]
Address = 10.0.0.1/32
PrivateKey = <Content of privatekey file>
ListenPort = 51820
Finally we specify the following IPv4/IPv6 forwarding rules (iptables manual):
PostUp = iptables -A FORWARD -i %i -j ACCEPT
PostUp = iptables -A FORWARD -o %i -j ACCEPT
PostUp = iptables -t nat -A POSTROUTING -o eth0 -j MASQUERADE
PostUp = ip6tables -A FORWARD -i %i -j ACCEPT
PostUp = ip6tables -A FORWARD -o %i -j ACCEPT
PostUp = ip6tables -t nat -A POSTROUTING -o eth0 -j MASQUERADE

PostDown = iptables -D FORWARD -i %i -j ACCEPT
PostDown = iptables -D FORWARD -o %i -j ACCEPT
PostDown = iptables -t nat -D POSTROUTING -o eth0 -j MASQUERADE
PostDown = ip6tables -D FORWARD -i %i -j ACCEPT
PostDown = ip6tables -D FORWARD -o %i -j ACCEPT
PostDown = ip6tables -t nat -D POSTROUTING -o eth0 -j MASQUERADE
On PostUp we configure the IP routing changes and on PostDown we remove the changes from the network configuration.
Replace eth0 with your LAN interface in PostUp, PostDown. You can use ifconfig to get a list of your interfaces.
After we specified the interface for the server, we need to specify the peers of the server. The server needs to know the public key of each peer as well as the IP address range. The IP address range specifies which IP address range will be accessible on the peer side.
For the office location we specify two IP ranges. First, we specify the WireGuard LAN IP of the office location: 10.0.0.2/32. The /32 limits the IP range to only one IP, in this case 10.0.0.2.
Then we add an additional IP range to redirect all requests to the office LAN to office peer: 192.168.1.0/24. The /24 limits the IP range to 255 entries (192.168.1.0 - 192.168.0.254).
[Peer]
# Name = Office Network
PublicKey = <Content of publickey file>
AllowedIPs = 10.0.0.2/32, 192.168.1.0/24
The complete server configuration in wg0.conf will then look like this:
[Interface]
Address = 10.0.0.1/32
PrivateKey = <Content of privatekey file>
ListenPort = 51820
PostUp = iptables -A FORWARD -i %i -j ACCEPT
PostUp = iptables -A FORWARD -o %i -j ACCEPT
PostUp = iptables -t nat -A POSTROUTING -o eth0 -j MASQUERADE
PostUp = ip6tables -A FORWARD -i %i -j ACCEPT
PostUp = ip6tables -A FORWARD -o %i -j ACCEPT
PostUp = ip6tables -t nat -A POSTROUTING -o eth0 -j MASQUERADE
PostDown = iptables -D FORWARD -i %i -j ACCEPT
PostDown = iptables -D FORWARD -o %i -j ACCEPT
PostDown = iptables -t nat -D POSTROUTING -o eth0 -j MASQUERADE
PostDown = ip6tables -D FORWARD -i %i -j ACCEPT
PostDown = ip6tables -D FORWARD -o %i -j ACCEPT
PostDown = ip6tables -t nat -D POSTROUTING -o eth0 -j MASQUERADE

[Peer]
# Name = Office Network
PublicKey = <Content of publickey file>
AllowedIPs = 10.0.0.2/32, 192.168.1.0/24

[Peer]
# name = Remote Laptop/Mobile
PublicKey = <Content of publickey file>
AllowedIPs = 10.0.0.3/32
Firewall
Secure the server by only allowing external access to the wireshark service as well as you ssh session.
sudo ufw allow 22/tcp
sudo ufw allow 51820/udp
sudo ufw enable
Verify the firewall settings:
sudo ufw status verbose
VPN (mobile) client configuration
For the mobile/laptop client we specify that both IP ranges (10.0.0/24, 192.168.1.0/24) will be redirected to the VPN server.
If you like to tunnel all your traffic to the VPN server you can use: 0.0.0.0/0, ::/0. This will redirect all IPv4 and IPv6 traffic through the VPN tunnel. Be sure to set a dedicated DNS server if you do this.
If you get the following error on starting wireguard /usr/bin/wg-quick: line 31: resolvconf: command not found you need to install openresolv (sudo apt install openresolv).
[Interface]
Address = 10.0.0.3
PrivateKey = <Content of privatekey file>
# DNS = 8.8.8.8, 2001:4860:4860::8888

[Peer]
# Name = vpn.domain.tld
PublicKey = <Content of publickey file>
Endpoint = vpn.domain.tld:51820
AllowedIPs = 10.0.0/24, 192.168.1.0/24

# If you're behind a NAT and want the connection to be kept alive.
PersistentKeepalive = 25
Use the following command to generate a QR code from your mobile.conf file. Scan this QR code with the WireQuard app on your phone to transfer the configuration.
$ qrencode -t ansiutf8 < mobile.conf
VPN office configuration
In the office configuration we specify IP forwarding to and from the local network as we did for the VPN server.
Remember to replace eth0 with your LAN interface in PostUp, PostDown.
[Interface]
Address = 10.0.0.2
PrivateKey = <Content of privatekey file>
PostUp = iptables -A FORWARD -i %i -j ACCEPT
PostUp = iptables -A FORWARD -o %i -j ACCEPT
PostUp = iptables -t nat -A POSTROUTING -o eth0 -j MASQUERADE
PostUp = ip6tables -A FORWARD -i %i -j ACCEPT
PostUp = ip6tables -A FORWARD -o %i -j ACCEPT
PostUp = ip6tables -t nat -A POSTROUTING -o eth0 -j MASQUERADE
PostDown = iptables -D FORWARD -i %i -j ACCEPT
PostDown = iptables -D FORWARD -o %i -j ACCEPT
PostDown = iptables -t nat -D POSTROUTING -o eth0 -j MASQUERADE
PostDown = ip6tables -D FORWARD -i %i -j ACCEPT
PostDown = ip6tables -D FORWARD -o %i -j ACCEPT
PostDown = ip6tables -t nat -D POSTROUTING -o eth0 -j MASQUERADE

[Peer]
# Name = vpn.domain.tld
PublicKey = <Content of publickey file>
Endpoint = vpn.domain.tld:51820
AllowedIPs = 10.0.0/24
PersistentKeepalive = 25
Test
You can now start WireGuard on all your devices. After all devices are connected you will be able to access the Office LAN by your mobile client.
# Start WireGuard
$ wg-quick up wg0
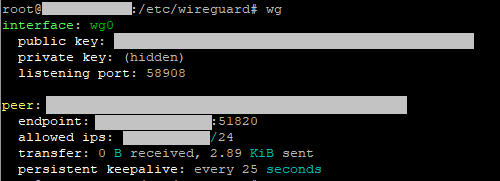
# Show connection information
$ wg show
# Stop WireGuard
$ wg-quick down wg0
Configure auto start
Start by making the WireGuard directory readable only by an administrator:
$ sudo chown -R root:root /etc/wireguard/
$ sudo chmod -R og-rwx /etc/wireguard/*
Then use systemd to initialize the VPN on startup:
$ sudo systemctl enable [email protected]
Resources
I used the following resources to aggregate this tutorial.